Introduction
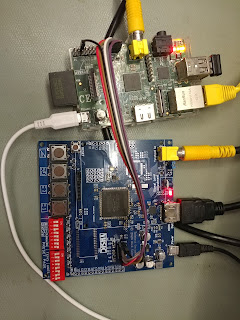
Often, the need to program an FPGA without the proper programmer arises because programming needs to be carried out remotely, by a customer, or on a one-off basis where the cost of the proper programmer cannot be justified. Most of the guides online cover Xilinx FPGAs, with little attention given to Altera, and I felt that an Altera/Intel FPGA programming guide was necessary, so I've decided to write this entry which explains how to program a MAX 10 FPGA using a Raspberry Pi.
These instructions are aimed at the FPGA Teletext board, but are valid for any MAX 10 FPGA board.
The method described here will use OpenOCD. No external components are needed, and the programming can be done over an Ethernet connection. It has been tested on a first-gen Raspberry Pi and should be compatible with every model.
Programming the Flash with OpenOCD is slower than using the USB Blaster, and it takes a few minutes.
Setup
The first part of the procedure is identical to Adafruit's guide to programming microcontrollers using a Raspberry Pi. Connect your Raspberry Pi to your network and follow all of the instructions to compile and install OpenOCD. I would suggest setting up a connection to the Raspberry Pi using SSH if you have not already done this as it will make controlling the Pi much easier.
On the Raspberry Pi, create a new file called openocd.cfg using nano or another text editor, in your home directory, with the following contents:
    source [find interface/raspberrypi-native.cfg]

    transport select jtag

  # The expected-id should be changed if you are using an FPGA other than the 10M08, you can find the IDs online

    jtag newtap 10m08 tap -expected-id 0x31820dd -irlen 10

  jtag_rclk 10000
Wire the Raspberry Pi up to the FPGA Teletext PCB's programming header using jumper wires. Use 100-ohm series resistors to protect the I/O against mishaps if you're not confident.
| TCK | TMS | TDI | TDO | |
|---|---|---|---|---|
| Raspberry Pi header pin number | 23 | 22 | 19 | 21 |
| Raspberry Pi GPIO number | 11 | 25 | 10 | 9 |
| Altera/FPGA Teletext Decoder programming header pin number |
1 | 5 | 9 | 3 |
Don't forget to connect GND on the FPGA Teletext PCB (pins 2 or 10 on the programming header) to the Raspberry Pi.
Programming the MAX 10 FPGA using the Raspberry Pi
On your computer, in Quartus, open the relevant programming file in the Programmer (POF for Flash programming), then go to File > Create/Update > Create JAM, JBC, SVF or ISC File. Make sure the file type is set to SVF, the operation is set to Program, and the speed set to something low like 1.0 MHz (the default of 25MHz is too fast for reliable operation with jumper wires). Move this file over to the Pi using PSCP.
Theoretically it should be possible to generate an SVF file from a SOF file and just program the SRAM, but I wasn't able to get this to work - programming would complete but the Flash (yes, the flash) would be erased.
Running this command will program the FPGA with the new design:
openocd -f openocd.cfg -c init -c "svf teletext-decoder.svf" -c shutdown
The new design should now be running on the FPGA.
If the Flash programming fails partway through the procedure, check that your jumper wires are making a good connection, then try lowering the clock speed when generating the SVF file. It would fail partway through the programming every time at the default frequency (25MHz) but it worked first time when I used 1MHz - the speed may need to be lower if using very long jumper wires.
Conclusion
This is a useful method for programming FPGAs with a Raspberry Pi. I see it as being especially useful for FPGA-based Pi Hats, where the FPGA can be permanently connected to the relevant pins on the Hat's connector, and also useful for products like the FPGA Teletext Decoder board where users are likely to own a Raspberry Pi but not a USB Blaster.
Next: Generating a high resolution HDMI/DVI output from an FPGA using Double Data Rate I/O
An alternative?
An alternative that's worth investigating: JTAG network programmer for Altera Quartus Prime. This should allow programming straight from the Quartus programmer and allow the use of SignalTap. When I tried it on an original Raspberry Pi, it was detected by Quartus, but the Raspberry Pi would freeze up completely whenever I tried to use it. I will experiment with it again on a newer model Raspberry Pi some time.
When trying that method, note that the pins on the header which need to be connected to the FPGA are different to the OpenOCD method, and after copying nw_jtag_srv to the Raspberry Pi, be sure to change its permissions using chmod 777 nw_jtag_srv.


No comments:
Post a Comment